- Secure order
- Easy return shipment
- Service-Hotline +32 50 89 35 27
Instructions No. 3207
Difficulty: Beginner
Working time: 2 Hours

Step 1: Cutting the strips
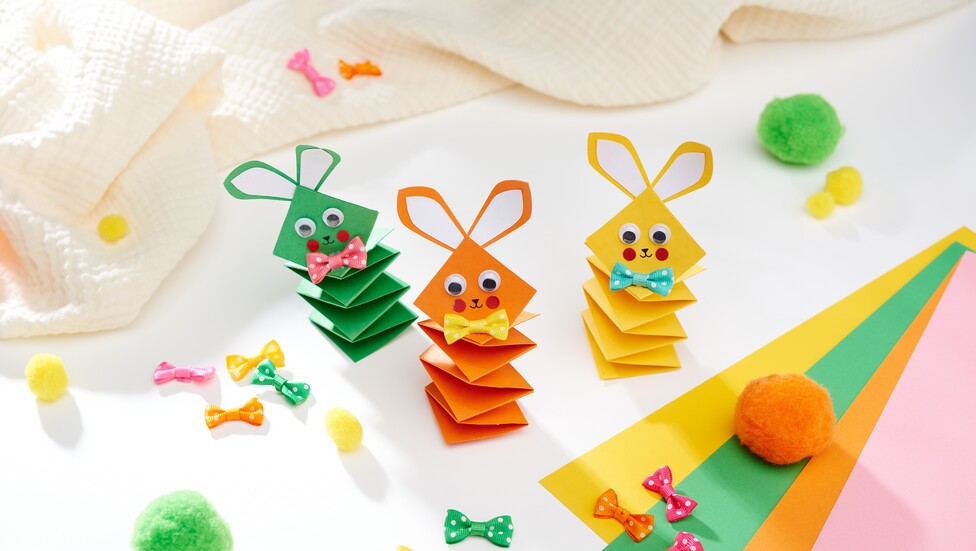
Start by taking a sheet of cardboard. Cut out two strips 4 cm wide from it. These strips will form the basis of your bunny.
Step 2: Fold the witch's staircase
Now it gets exciting: fold the two strips into a so-called witch's staircase. This means that you alternate the two strips on top of each other by folding them at right angles. This creates a fun, stepped pattern. Glue the ends of the strips at the beginning and end so that the witch's staircase doesn't come loose again.
Step 3: Design the bunny head
Cut a little across the middle of both sides at the top and fold it up.
Step 4: Decorate the face
Now it's time to give your bunny a face. Start with the eyes: stick small eyes on the top of the witch's staircase. Then draw on the nose and mouth with a pencil. For the cheeks, you can punch out small circles with a hole punch and attach them next to the nose. These little details will give your bunny a friendly expression.
Step 5: Add the ears
Now you need the right bunny ears! transfer the template for the ears to a piece of Paper or cardboard and cut them out neatly. Glue the two ear pieces together and then attach them to the top of your bunny's head.
Step 6: Attach the bow
For the finishing touch, you can take a small bow and glue it underneath the face. It gives your bunny a charming touch and hides the crease on the witch's staircase.