- Secure order
- Easy return shipment
- Service-Hotline +32 50 89 35 27
Instructions No. 3530
Difficulty: Advanced
Working time: 1 hour
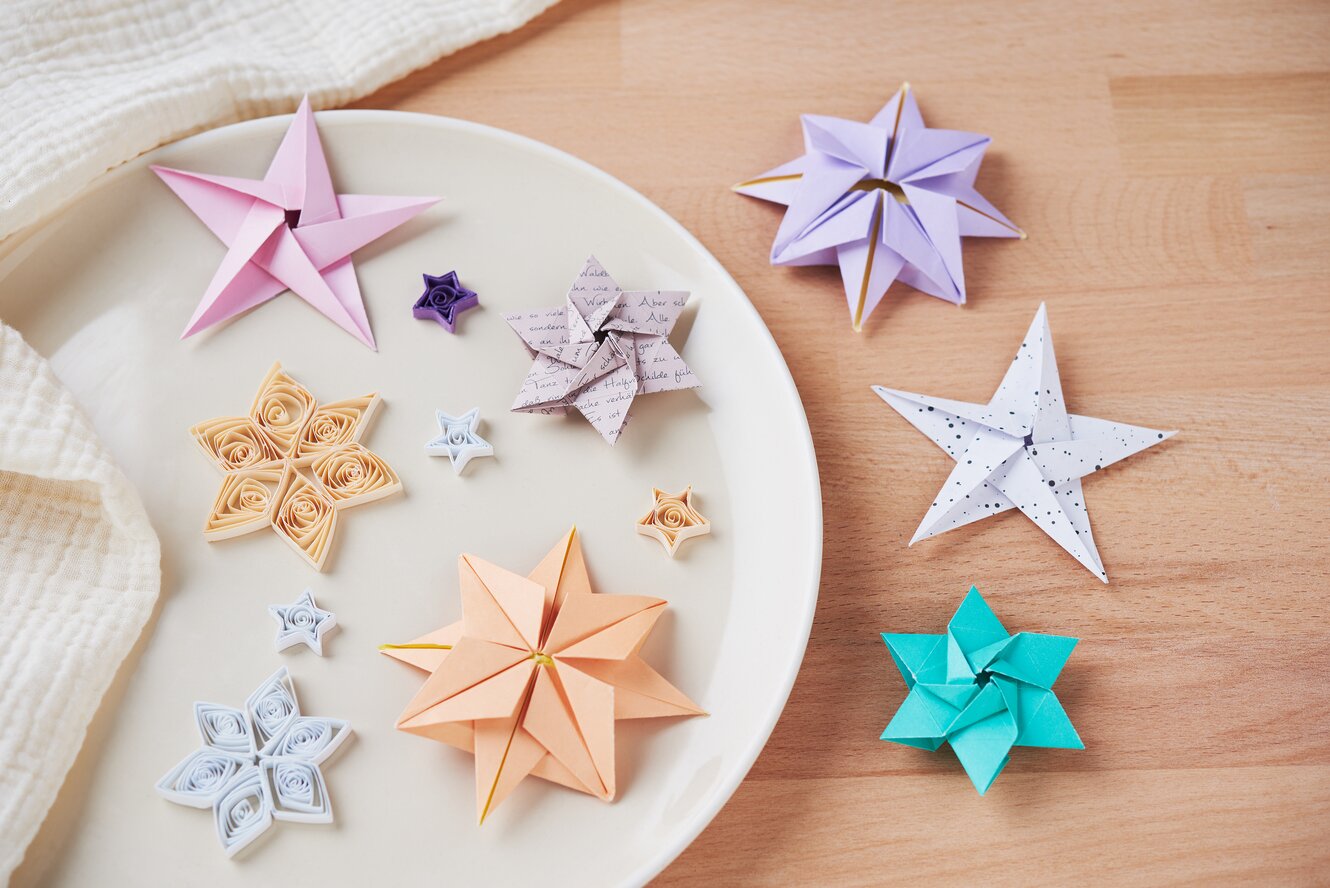

Star 1: The classic folding star
Preparing the paper
Use a square sheet of paper Paper and fold it once in the middle. Make sure that the resulting fold is at the top.
1. First steps for shaping
Take the edge of the top sheet and place it on the top edge of the open side. Fold the Paper and turn it over.
2. Creating the fold lines
Pull the bottom left corner towards the center so that the left one lies on the top edge. open the fold again.
3. Folding to the point of the star
Fold the top right corner to the center of the previously created fold. Then place the same corner on the right edge so that both edges are on top of each other.
4. Refining the star shape
Turn the Paper over and place the bottom edge against the folded left-hand part to form an arrowhead.
5. Shape the center line
Lift the sheet up and fold the left and right sides down to create a central fold.
6. Final shape of the pentagon
Hold the folded Paper in front of you and turn it so that the tip is pointing to the left. Cut out a right-angled triangle along the left edge. Unfold everything to create an even pentagon.
7. Star formation
Point one tip of the pentagon upwards and fold the corners of the bottom lace to the fold lines of the top lace. Repeat this with all the pentagons and finally bring all the corners together so that the lace move in a circular direction.
8. Finishing the star
Press the star flat and turn it over. Now recognize a pentagon on the back. Fold the bottom half of each point towards the center so that the lace overlap and hold each other in shape.
9. Final turning over
Turn the star over to admire the final work of art.

Star 2: Quilling diamond star
1. Preparing the paper
To make a beautiful poinsettia, you will need a total of 1.5 folded sheets or 6 paper strips. If you are using folding paper , cut it into quarters first to get the strips you need.
folding paper prepare:
Take a folding paper and first fold it in half so that you have two halves. Fold these halves again to make quarters.
Carefully cut out the resulting quarters to get the paper strips you need.
2.Folding the paper strips
Now it's time to fold the paper strips . This is an important step in creating the basic shape of the folding star.
paper strips fold:
Fold each paper strips once in the middle. Then fold both ends of the strip towards the center. Repeat this process for all 6 paper strips.
3.Gluing the checks
Your next step is to glue the folded paper strips, together to create the check shape.
Create the checks:
Glue the ends of the paper strips together with a piece of double-sided tape adhesive tape .
You should now have a check (square shape).
4.Assembling the folding star
Now assemble the checks into a beautiful poinsettia. You will need the double-sided adhesive tape and a piece of pearl yarn for this.
Join the squares:
Stick all 6 squares together using the double-sided adhesive tape . Place a piece of pearl yarn between two of the squares so that you can hang the star up later.
Finally, glue these two checks together to complete the folding star .
Carefully wrap a quilling strip around a quilling tool to form a tight spiral. Make sure to wrap the spiral evenly and tightly.
6. Roll up and secure
Carefully remove the spiral from the tool and allow it to roll up slightly until it has reached the desired size. Glue the free end of the strip with a little handicraft glue to secure the shape, repeat this 5 more times so that you have 6 spirals
7. Glue the quilling into the star
Now place your spirals in the individual diamonds of the star. Glue the spirals into the diamonds with some craft glue.
Star 3: Quilling star with jagged design small
1. Form the spiral base
Start by wrapping the quilling strip around the quilling tool until a firm, even spiral is formed.
2.Adjusting the size and fixing
Remove the spiral from the tool and roll it up to the desired size. Secure the end of the strip with handicraft glue.
3.Creating prongs
Gently press the edges of the spiral together to press small prongs into the shape. Work precisely to achieve the typical star look.