- Gratis verzending vanaf 75 € binnen België
- Eenvoudige retourzending
- Telefoon +32 50 89 35 27
Instructies Nee. 3122
Moeilijkheidsgraad: Beginners
Werktijden: 4 Uren
Welkom in de magische wereld van Secret Santa-deuren
Ben je klaar voor een magisch knutselproject dat een speciaal tintje aan je huis zal geven en de verbeelding van het hele gezin zal inspireren? Met onze stap-voor-stap instructies kun je een prachtige Secret Santa-deur maken waar iedereen blij van wordt, niet alleen slechts tijdens de kerstperiode. Secret Santa deuren zijn een geweldige manier om een beetje magie in je dagelijkse leven te toveren en je kinderen een nieuw en spannend verhaal te vertellen.
Onze gedetailleerde instructies leiden je door het hele proces en laten je zien hoe je een betoverende Secret Santa deur kunt maken met slechts weinig materialen. Laten we beginnen!

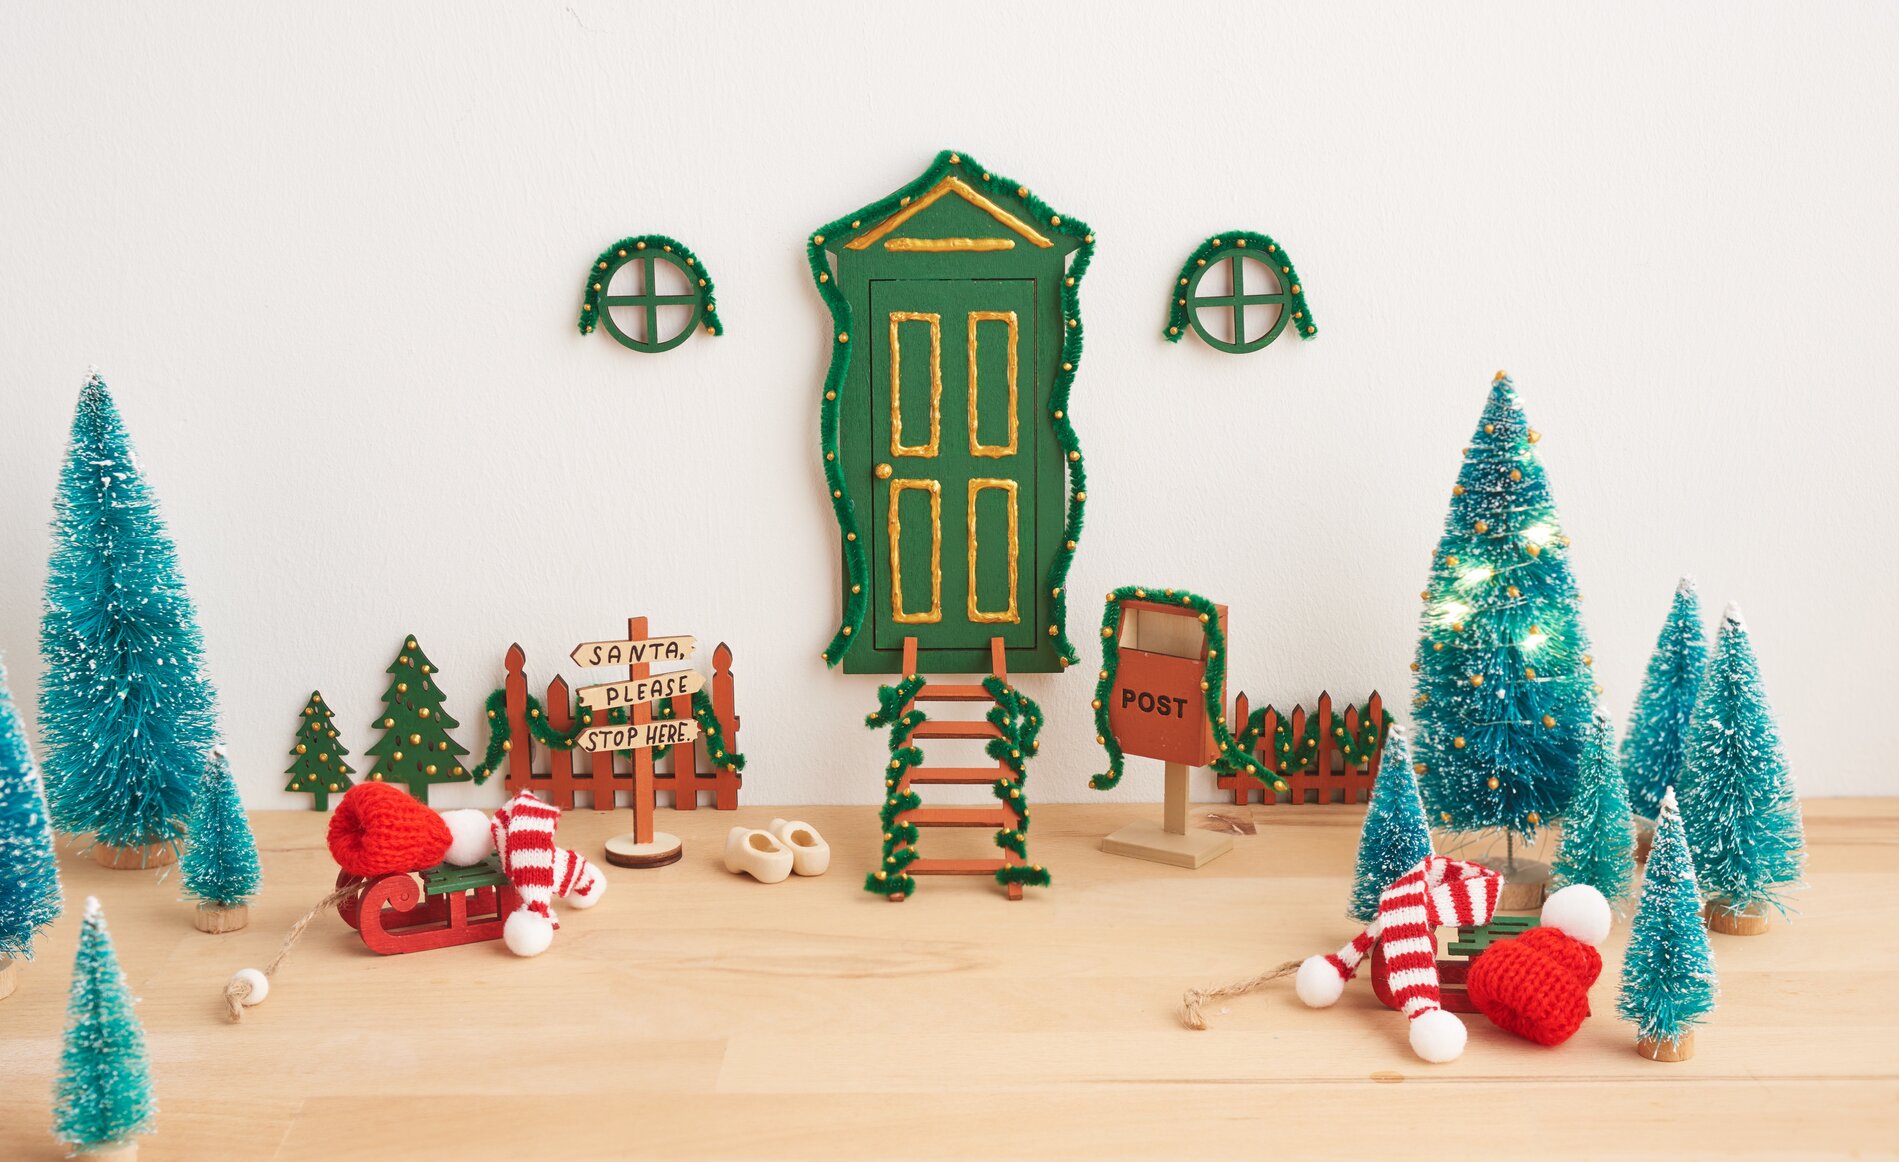
Stap 1: Schilder de Secret Santa deur
Om je Secret Santa-deur te laten stralen, begin je met het schilderen van de deur en accessoires, zoals een wegwijzer en de zittingen van de sleeën, met de knutselkleuren van je keuze VBS Kleuren van je keuze. Verdeel de verf gelijkmatig en laat het goed drogen voordat je verder gaat met de volgende stap.
Stap 2: Details toevoegen
Je kunt de gemarkeerde delen van de deur overtrekken met de VBS pearl-Pen. De pearl-pen is ideaal voor het aanbrengen van verhoogde en glanzende details om je deur een luxueus tintje te geven. Laat de kleur weer goed drogen zodat de details niet gaan vlekken.
Stap 3: Bevestig de slingers
Neem nu de chenilledraad en vorm er betoverende slingers van. Plak ze rond de deur, de ramen, de hekken, de ladder en de brievenbus. De chenilledraad is gemakkelijk te buigen en in de gewenste vorm te gieten. Je kunt de pearl-pen gebruiken om kleine 'kerstballen' op de slingers te deppen, zodat het net glinsterende sieraden lijken.
Stap 4: Versier de miniatuurkerstboom
Om de miniatuurkerstboom extra feestelijk te maken, wikkel je er een mini-snoer lampie omheen. Bevestig de kabel voorzichtig aan de basis van de boom met hete lijm om te voorkomen dat hij wegglijdt. Vervolgens kun je er met de pearl-pen weer kleine "kerstballen" op plaatsen, die het licht van de ketting weerkaatsen en voor extra magische effecten zorgen.
Stap 5: De wegwijzers labelen
Om je kabouterdeurscène af te maken, schrijf je op de wegwijzer met een marker. kleurmarker, ideaal voor fijne en permanente letters. Schrijf fantasierijke aanwijzingen of geestige spreuken die je bezoekers zullen doen glimlachen.
Je magische Secret Santa-deur is klaar om ontdekt te worden op slechts ! Met deze kleine, liefdevolle details wordt je Secret Santa-deur vast en zeker het hoogtepunt van het seizoen en zorgt hij voor veel gelukkige momenten.
Klaar om je eigen Secret Santa te verwelkomen? Bezoek onze online shop en sla alle materialen en ideeën in die je nodig hebt om meteen aan de slag te gaan. Laat je creativiteit de vrije loop - we kijken uit naar je knutselproject!


